You thought I wasn't going to work on this blog again. You were wrong!
I'll be posting at least once a week on this blog for this growing season. I am not sure of the schedule yet, but I'll have it worked out soon.
You can also, as always, find the rest of my work on my REAL website: http://www.jaredgarrett.com
See you soon!
Friday, March 18, 2011
Tuesday, June 15, 2010
Tuesday's Timely Tip
Howdy. I noticed at least three typos in the previous post.
Please forgive me for my bad grammaring.
You probably noticed that I haven't posted for a couple of weeks. That is because I have been inundated with work to finish my MA project, write-up and defense. I also started my new, full-time job.
So things have been a bit busy.
In any case, Tuesday's tip is in regards to slugs. I intend to post on Friday regarding the compost system and it is then that I will provide pictures of the garden so far.
Slugs and snails are a major nuisance. We have used eggshells in the past, and they have worked somewhat. To use eggshells to deter slugs, you just save a bunch of them and let them get dried out. Then you crush them and sprinkle a barrier around each plant or planting bed. It can be about 1/4 inch wide. Slugs will get sliced to ribbons on them, so that works pretty well.
The problem is that worms would come up from the ground at night and mess up the eggshell barriers. Also, the snails around here are massive, and they just plow through the barriers. So the eggshells were only semi-effective.
I admit that I used slug bait once. I feel bad, but it worked really well. You can just buy bags of it at your local nursery or home and garden store.
We also tried cups of beer, sunk in the ground. The idea is that the beer was very attractive to slugs and snails and they would find the stuff and then drown in the cups. This worked fine, but dirt filled the cups pretty fast.
So what works? Two things: chickens and timing the watering. Oh, make it three things: kids also.
Our chickens get let out pretty early in the day. They spend most or all of the day wandering the yard. They eat bugs like made and they love slugs and snails. There are far fewer of these slimy critters these days. Also, we only water in the morning. This lets the ground dry out during the day so that when evening falls, which is when the slugs and snails love to come out, the ground in the garden is dry. This seems to be deterring them also.
Finally, send kids out to roam the garden patches in the morning. Their mission: hunt down and slaughter all snails and slugs. Sometimes they toss the evil slimers to the chickens and the chickens do the wet work.
Totally organic. Totally effective. Totally freaking cool.
Finally, we dropped the price of the surplus tomato plants to $2 and they went like hotcakes. We sold all of them in about two weeks.
That's all for today. Back Friday for some compost and pictures.
Don't hog this blog! Share with your friends.
Friday, May 28, 2010
Updates on my Provident Garden
As promised, it is Friday and I am back to post some updates on my gardening efforts. I have loads of photos.
So I spent around six hours last Saturday working on the gardens. I've planted:


So I spent around six hours last Saturday working on the gardens. I've planted:
- pumpkins
- scallop squash
- three types of cucumber
- peas
- tigger melon (yes, that is Tigger as in Winnie the Pooh)
- carrots
- zucchini
We've still got to put peppers, eggplant, lettuce and tomatoes in the ground. Oh, beans too. I'll do most of that tomorrow.
As I worked, it quickly became clear that the chickens were going to destroy my planting beds and tear up any seedlings. I had to come up with a way to keep them totally out of the gardens. I think what I worked up will function well and is not too terribly ugly. Here:

I put up some tall poles on the edge of the garden. These are left over from the portable carport we used to have that got torn to bits in one of Utah's windstorms. I also lined the entire garden plot with plastic wicker fences that are about eight inches tall at their tallest. I anchored the poles to the fence in several spots. Then I stretched a bunch of bird netting between the poles, tying it off tightly and using garden staples to get the netting close to the ground. From fifteen feet away, our garden looks like what you see above. Here's a corner:

You can sort of make out the netting. I wove some of my heavy duty twine through the top of the netting and tied it off tightly in order to keep the netting from sagging too much. You can also sort of see the planting beds. This is where the cucumbers, squash and zucchini are planted. Should see sprouts in another week.
Here's the other end of the garden:

You should be able to see some mesh, as well as the pumpkin plants. The sun is about 1/2 hour from hitting those pumpkins full on.
The chickens seem to be able to make out the mesh easily; they haven't even tried to go into the garden since I put it up. Here they are-- earning their keep. We haven't had a problem with pill bugs or earwigs since the chickens began spending their days roaming the back yard.

Since Annemarie can't stand earwigs and pill bugs are a bit of a nuisance, I'm accepting this pest elimination by the chickens as a rent payment along with their eggs.
We were also having a problem with the chickens spreading the compost hither and yon. Here's what I did to fix that:

That's just a piece of plywood that I had sitting around. It took me less than five minutes to get this door up. No hinges, just a stake pinning the plywood against the compost frame:

So it's easy to move because it's lightweight and isn't attached. The stake is far enough in the ground that I'm not going to trip on it:

Look at that luscious compost!
Now, one of the issues that needed to be dealt with was how I could protect the garden and still allow access to we homo sapiens. Easily done. I stuck another pole in the ground. I stretched the netting around the corner pole and tied it off to the new pole. Then I made a barrier from the fence to a point a few feet away from the pole. Now we just use a large piece of wood to fill the gap when we want to keep things closed and just move the wood to get in.

It's working well!
Last, I wanted to share an image of my front yard and flower garden.

Our phlox- the pink/purple stuff off to the right-- is just about finishing its blooming cycle. We have four salvia plants, this corner one is blooming like crazy and the other two in the front are getting going as well. There is a huge salvia in the middle of the phlox, but it usually goes later in the season. Salvia is the tall purple flower right in the corner.
We are eating strawberries, harvest chives and parsley, enjoying the yellow/red of the stonecrop, and are stunned at the size of the daisy patch.
The grass, yes, is lovely. I mow every week so I can mulch without a problem. I water for a long stretch about twice a week. Also, it's hard to see them, but we have some nice irises that are gearing up to bloom in front of the house.
So that's the update. We are a little late with the garden this year, but we have high hopes of catching up in the next three weeks.
Incidentally, we have about 25 tomato plants. I'm selling 14 of them, $5 a piece. They are all heirloom. I have a sign out front (it's behind the big salvia). This is a nice way to make a little bit of packet cash
Next time I'll post a clip of how my three-tiered compost works. I'll also discuss strategies for keeping slugs our and getting rid of them and snails when they show up.
Tuesday, May 25, 2010
A quick guide to transplanting tomato seedlings
Alright.
Yes, it's been a while. Exhaustion had its way with me, but I'm fighting back! I thought I could probably just post a bunch of videos and photos of when I transplanted my tomato seedlings.
Now, I did this about one and a half weeks ago, or on May 15. That is about two weeks later than I usually would do this- but what can I say? Life is sometimes complicated.
In a normal year, my tomato plants would actually be in the ground already. This year, I was lamenting the fact that they weren't until yesterday. You know what happened yesterday, right? Northern Utah was plastered with tons of snow. Yes, on May 24, we had snow here.
So I was glad my tomato plants were not in the ground. They should be in the ground in about another week or two. That will be fine.
Anyway, I really like to keep costs down, so here's what I do for planting pots:
Once the pots are ready, you want to get a layer of dirt in there and pack it well, mainly so that the dirt doesn't just spill out the holes you just cut. Since I tend to have a lot of seedlings, I do this as an assembly line in order to be efficient.
Here's the simple process:
Next, you want to just start planting:
When everything is transplanted and placed back on the windowsill (or shelf, depending on where you are setting these), water them well. What does 'well' mean? You can water them so water comes out the bottom.
Then don't water them for a week-- or at least as long as it takes for the dirt to look quite dry. I've said this countless times, but I am happy to say it again: This wakes up your seedlings' roots.
Okay, so here are my tomatoes, all transplanted and arranged on May 15 (about 10 days ago):

And here they are today:

Not bad, eh?
Anyway, here is probably a good place to announce a revision to this blog's approach. Instead of trying what seems to be impossible at this point: a post every day, I will post stuff here on at least Tuesday and Friday.
See you Friday! I will share with you some of the things I've put in the ground and how I have protected our planting patches from our chickens.
Yes, it's been a while. Exhaustion had its way with me, but I'm fighting back! I thought I could probably just post a bunch of videos and photos of when I transplanted my tomato seedlings.
Now, I did this about one and a half weeks ago, or on May 15. That is about two weeks later than I usually would do this- but what can I say? Life is sometimes complicated.
In a normal year, my tomato plants would actually be in the ground already. This year, I was lamenting the fact that they weren't until yesterday. You know what happened yesterday, right? Northern Utah was plastered with tons of snow. Yes, on May 24, we had snow here.
So I was glad my tomato plants were not in the ground. They should be in the ground in about another week or two. That will be fine.
Anyway, I really like to keep costs down, so here's what I do for planting pots:
Once the pots are ready, you want to get a layer of dirt in there and pack it well, mainly so that the dirt doesn't just spill out the holes you just cut. Since I tend to have a lot of seedlings, I do this as an assembly line in order to be efficient.
Here's the simple process:
Next, you want to just start planting:
When everything is transplanted and placed back on the windowsill (or shelf, depending on where you are setting these), water them well. What does 'well' mean? You can water them so water comes out the bottom.
Then don't water them for a week-- or at least as long as it takes for the dirt to look quite dry. I've said this countless times, but I am happy to say it again: This wakes up your seedlings' roots.
Okay, so here are my tomatoes, all transplanted and arranged on May 15 (about 10 days ago):
And here they are today:

Not bad, eh?
Anyway, here is probably a good place to announce a revision to this blog's approach. Instead of trying what seems to be impossible at this point: a post every day, I will post stuff here on at least Tuesday and Friday.
See you Friday! I will share with you some of the things I've put in the ground and how I have protected our planting patches from our chickens.
Wednesday, May 19, 2010
A change and then stumps...
Okay, I was going to post every day- and I did alright, but the fact is that I can't keep up! What with family needs, finishing my MA write-up and defense, working on my latest novel (have a personal deadline I need to keep), working, looking for a job, and actually DOING the gardening, I just don't have the time.
I will post twice weekly.
Here's this week's post. It's about stumps. Granted, if you needed to clear stumps from your gardening area, you probably need to wait until next year now, but this article will help-- whenever you get to it.
So keep in mind that just because you have an unsightly trunk doesn't mean you are an ugly elephant.
Maybe we're talking about the trunk of an old tree on your property!
If you do have a tree stump on your property, there is one single best way to remove it. First, get a heavy chain, ala Jacob Marley. Second, wrap one end of your strong chain snugly around the stump. Third, attach the other end of the chain to your heavy duty truck. Fourth, drive.
Fortunately, this is also the most enjoyable way to remove a tree stump.
However, there are a variety of impediments to this method of removing a stump. Perhaps you lack a heavy chain, a tough truck or it might even be possible you don't have the space to work with for this approach. If the method described above is impractical for your situation, rest easy; there are plenty of other approaches to this job.
The bad news is that most of these other methods are not as fun and they require more work.
Method #1: Stump Killer
This method is listed because it takes the least effort. You can very easily find and purchase some stump killing chemicals from your local garden center or large DIY store. Follow the directions closely, being very careful not to spill the chemicals on the ground or other plants.
The directions usually include these steps:
*Drill several holes into the stump, usually from sides near the top, going in and down at a slanting angle.
*On a clear day, pour some stump killer into the holes.
*Wait a given period of time. Your stump will be killed from the inside out.
*After the time period is up, you should be able to easily yank the stump out. It will probably be rotten and brittle.
You can also put saltpeter into the holes. This stuff is usually a powder and you have to add water to it to help it dissolve into the stump.
Method #2: Stump Grinder
This is another fun approach, but it's sometimes difficult to find one of these machines that is available to rent.
If you can find a stump grinder, often fabricated by Vermeer or Carlton, you need to read the operator's manual carefully so that you don't put yourself or others in danger. You also want to make sure the stump isn't near buried lines or pipes.
Using a stump grinder is quite simple. This machines vary in appearance and mobility, but the good ones have a wheel at the front that is lined with carbide-tipped teeth. This wheel spins at a high velocity and you guide it into your stump and down into the roots. Most machines can go about twelve inches down into the ground.
You have to start with a stump that is not very high-- say six to eight inches at the most.
When the stump grinder is done, you will have loose soil and loads of wood chips. Use your hands or rakes to remove the chips, dump some soil in the space, and you are ready to put in grass or garden.
Method #3: Elbow Grease
Now we're done with the easy and fun approaches. This last method requires diligence and planning. If you go after your stump willy-nilly with a shovel and pick-axe, you are going to waste time and energy.
First, it is best if your stump is tall, say four to six feet. So if you are taking down an entire tree, don't cut it down close to the ground. Leave some height. Of course, if you are dealing with a stump that is only a couple feet tall or shorter, you will have to go with it. You won't have the leverage that height lends you, but you can still get the job done.
Second, you need to understand that trees have more than one type of root. There are the branching roots that extend in all directions from the base of the tree. These branching roots have smaller vein-like roots. Then the tree has a heart root. This is also called a tap root or flat root, depending on the tree. This root tends to go fairly straight down.
You want to get at that heart root in order to remove the stump completely and with as little work as possible.
Here's the procedure:
*If you have grass or foliage near the stump that you want to preserve, cover it with a tarp. Put your dirt and other debris on the tarp as you go.
*Use your spade to clear as much dirt away from the base of the stump as possible. You can go about 1 to 2 feet out from the stump. You might end up with a hole that has a large diameter, but that's going to be okay. You want space to work.
Go down as deep as you can with the spade. Use it to chop smaller roots and find and clear dirt away from larger roots.
*Get your pick-axe and chop the roots you've identified. Chop them in two places: as near to the tree as you can safely reach and about a foot out. You do this so your spade has plenty of space to work in clearing away more dirt.
*Use your spade and pick-axe to remove more dirt and whatever rocks you might find. As you get more than a foot down, start trying to clear dirt away from the base of the tree that has been under the ground. You are looking for that heart root.
*Keep following this procedure, going around the trunk and identifying and chopping roots, then clearing away dirt.
*After a few rounds of this, if your stump is high enough, push on the top. Start wiggling it back and forth. If you don't have a high enough stump, get a pry-bar or long crowbar and find a place to jam it so you can get some lift on the stump.
Don't try to pry or leverage the stump out in one go. First try to get some wiggle, then more and more movement until the stump is moving fairly well. If you have wiggle but cannot just pull the stump out, you are still after the heart root.
*Clear more dirt away, then angle your pick-axe so you are chopping at the root heading straight down from the stump. Chop at that root and then wiggle the stump more. You will soon find that you are getting more movement.
*With steady work, you will reach a point where you can pry or leverage the stump right out.
I followed this procedure with a tree last year and left about five feet above ground. With that height, I was able to leverage the tree out after only one or two rounds of chopping at roots; I didn't even have to find the heart root.
Of course, if you do have a heavy truck, a strong chain and plenty of space, you can skip all of this and be done in time for a cold lemonade and the basketball playoffs.
Saturday, May 15, 2010
Too busy!
I'm supposed to post here every day. The last few days have been way too busy for me to be able to take the time. I should have time tomorrow.
See you then.
See you then.
Wednesday, May 12, 2010
Little update- moving along soon
So it's the middle of May and we still don't have much in the ground. Why? Because of weather and time issues. Over the last two weeks, we have had probably 40% rainy days and the temperature has been quite lame indeed.
We also need to get the garden tilled. We've never waited this long- and the truth is that we never wanted to wait this long. Again, it's been an issue of time and circumstance.
I don't think it will be a big problem. Okay, I hope it won't be.
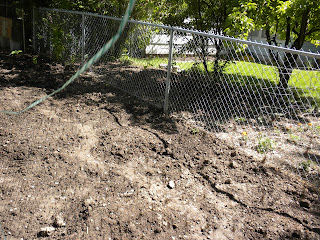
Here are two pictures of the garden in its current state.


Yeah, it looks pretty good actually. All this rain at least has kept the dirt and the organics working together. Remember that you need to keep your compost and garden patches moist in order to encourage worms to show up.
Worms are friends.
In any case, we've got peas in our neighbor's garden patch. Her name is Donna. She's getting a little seasoned so she doesn't garden any more. Usually she invites a local family without garden space to use her plots. She couldn't find someone this year, so we're going to put our peas and tomatoes over there.
Here's a shot of our seedlings-- not so small anymore. I transplanted pumpkins, as you can see.

I will transplant tomatoes tomorrow night, probably film a segment and use that clip as my post tomorrow. You see, I used to be able to depend on Saturday as the day I could get a bunch done, but other things keep getting in the way, not the least of which being weather.
So I have to make time in the evenings to do these things. Which means I have to cut into my writing time. That's okay, all will get done.
I hope your gardening is going well. Remember that one of the best ways to keep weeds from being a massive pest is to nip them in the bud. As soon as you see them, take a hoe or a claw to them and yank them.
More tomorrow. Don't forget to follow, share and come on back!
We also need to get the garden tilled. We've never waited this long- and the truth is that we never wanted to wait this long. Again, it's been an issue of time and circumstance.
I don't think it will be a big problem. Okay, I hope it won't be.
Here are two pictures of the garden in its current state.


Yeah, it looks pretty good actually. All this rain at least has kept the dirt and the organics working together. Remember that you need to keep your compost and garden patches moist in order to encourage worms to show up.
Worms are friends.
In any case, we've got peas in our neighbor's garden patch. Her name is Donna. She's getting a little seasoned so she doesn't garden any more. Usually she invites a local family without garden space to use her plots. She couldn't find someone this year, so we're going to put our peas and tomatoes over there.
Here's a shot of our seedlings-- not so small anymore. I transplanted pumpkins, as you can see.

I will transplant tomatoes tomorrow night, probably film a segment and use that clip as my post tomorrow. You see, I used to be able to depend on Saturday as the day I could get a bunch done, but other things keep getting in the way, not the least of which being weather.
So I have to make time in the evenings to do these things. Which means I have to cut into my writing time. That's okay, all will get done.
I hope your gardening is going well. Remember that one of the best ways to keep weeds from being a massive pest is to nip them in the bud. As soon as you see them, take a hoe or a claw to them and yank them.
More tomorrow. Don't forget to follow, share and come on back!
Subscribe to:
Posts (Atom)