Thursday, May 6, 2010

Since I didn't post yesterday,

I will put up two posts today. 


But first, let me explain. No, it would take too long. Let me sum up. 


(If you get the reference, you get a pat on the back!)


So I have been blasting away at my MA project write up. If you don't know what MA means, it is my Master of Arts degree. I have completed all of my course work, and now I must finish the write up and defend and all of that. Last night I finished the first major draft of the write-up. It's about sixty pages long. Because I had to get it done last night, I opted to stay focused on it until it was done. Then it was really late and bed called. 


Two posts today. One now and one later! (Is anybody else suddenly thinking about chewy candy?)


The first one is what I will call the icing on the cake of soil cultivation. Did you know that one of the best ways to fight weeds in your garden is by cultivating healthy soil? Here's what I've learned. 


You see, I am an avid gardener. I love to have my fingers in the soil and I particularly love to have my kids join me in the garden. But I am by no means a pro. My neighbor from two doors down, on the other hand, is very much a pro. The other day I was complaining to her about the weeds that spring up from all the elm tree seed pods that fly around during the spring. So she said she never really has a problem with weeds. Stupefied, I listened as she described how she controlled weeds.


Shirley is her name. She told me that keeping the soil healthy and cultivating and nourishing it is the surest way to control weeds. Here is what she does.
Every Autumn, when the season is over, she has her husband till the garden up, with all of the dying veggie plants and some steer manure mixed in. He tills the garden well, breaking up the clumps and loosening it well.

Then, come Spring, Shirley has her husband till the garden again. This turns any nascent weeds upside down and kills their root system stone cold dead. After that, Shirley and her husband, Ted, top the garden soil with the bottom of their compost heap.
All of this activity keeps the soil's natural nutrient balance perfect, and also gets rid of the weeds that sometimes sprout from flying seeds. Furthermore, the soil promotes spectacular flowers and veggies. When these veggies and flowers grow strong and healthy, they basically do not allow weeds to come around and take up space.

As a final note, we are also glad we have chickens. When those elm seeds go flying and end up on our ground and garden plots, we let the chickens loose. Those happy hens gobble the elm seeds up-- nipping the problem right in the bud!

I'll see you later today. Remember: you can follow this blog and use Google Reader to keep up to date with the feed. You can also just use whatever RSS feed you already use. But don't keep it to yourself! Share!

Tuesday, May 4, 2010

Another important issue for lawn health: Aeration

Okay, so now is a good time for aeration. You might have even had someone come to your door to convince you to pay them to aerate your lawns.

I hope you accepted.

Here's why.

The next time you go to a garden center or a DIY store's garden section, peruse the aisles that deal with lawn care.


As you walk down the aisle of the garden center your eye might be caught by an amazing looking device. It looks like a boot with spikes jutting out of the bottom. Is it an armored soccer or football shoe? No. It is a lawn aerator. But what is the difference between these spikes and the plug method of aeration? And which is better for your lawn? Let's explore some of the going wisdom about this issue.

SPIKES

A spike for your lawn is exactly what it sounds like. It jabs deeply enough into your lawn to get through the grass's root system. Theoretically, this allows air, water and fertilizer access to the roots of your grass, thus making the lawn healthier and greener. However, spikes simply don't cut it on lawns planted on heavy clay or even in very loose soil. Why? Because clay is very resistant and will often seal right up as soon as you slide that spike out. And looser soil will just fall back into the hole, filling it right back up. Spikes take no dirt and no grass out, like plugs, but instead they just make an iffy hole.

PLUGS

Plugs are, once again, exactly what they sound like. They are tiny cylinders of your lawn that are cut and pulled out by a machine. These cylinders leave behind small holes which don't collapse much, if at all. And if loose soil collapsed into these small holes, that would be fine, there would still be a hole left, as the plugs remove a small quantity of soil and grass. What is more, the plugs are left on your lawn to break down and actually provide some nice natural fertilizer for your grass. A small drawback of having plugs taken out for aeration is that these little plugs are indeed left all over your lawn. So for a day or two your lawn might look like a tiny gopher was building a metropolis under your yard. However, the plugs deteriorate fast with water and traffic. And the holes that the plugs leave behind provide good, reliable access for fertilizer, water and air to the root system of your grass.

Which do I recommend for your lawn's aeration? Plugs, all the way. A local grass care company should be able to plug your lawn in a matter of minutes, usually for no more than $20. So leave the insane cleats at the garden center and hurry home to call the aerator guy.

Monday, May 3, 2010

And now for something completely different

Okay, not completely different, but somewhat. I thought it would be nice to take a break and share a narrative I wrote about an early gardening experience I had. It was a, shall we say, learning experience.

It was April and the last snow of the season had come and gone. The back yard of my home in central Utah was beginning to show signs of life, with the green of grass warring with the yellow of budding dandelions. My garden plot was looking good. Really good. I had taken pains to put it to bed properly at the end of the previous season, and I had been planning this year's garden for five months! Five months of sketching designs and plans, layouts and trestles for beans. And now the time was fast approaching.


I turned to my wife. "Hey," I said, all innocent and completely ignorant of the pain I was about to commit myself to, "why don't we plant some corn?"


"Great idea." She squinted in thought. "Is it hard to grow?"


I shrugged. "No way. Everybody does corn."


Three weeks later I was ready. I had tilled the plot again, mixing in some nice steer manure and keeping it watered to get the worms excited. On a perfect, sunny Spring day, with a packet of seeds in hand, I dashed outside and planted four rows of corn in the southern end of the garden. I splashed some water on the five by ten foot area of future cobs and then moved north up the plot to put in some beans and zucchini.


Two weeks later I stared morosely at the bare plot. No corn sprouts. None. No future maize. Glaring at the dirt, then the sky, I asked, "Why?" Nobody answered. I jerked open the shed door and dug through my box of seed packets, finally coming up with the packet of corn seeds. Having only cursorily skimmed the planting instructions, I had not actually read all of the information available. Two lines down, I found the problem: Plant in warm ground in a sunny area.


I looked up and glared again. But this time, I glared at the trees that shaded the southern end of my garden for about six hours of the day. Muttering to myself, "Too early. Planted them too early. Gotta have warm ground," I made my way to my healthy tomato plants and took solace in their rough stems and fuzzy leaves. I broke a leaf off and inhaled that wonderful sharp aroma of the tomato plant's foliage. Recharged, re-energized and renewed, I weeded around my zucchini then went inside.


"Yeah, so we planted that corn in the wrong place," I said, stepping through the back door into my small home. "Needs to be in direct sunlight."


"What do you mean 'We'?" my wife asked, grinning at me.


I muttered something witty and rude and stalked off to the kitchen, in search of a drink of water. "Yeah, well we'll give it some time. Maybe as it warms up and stuff it'll grow okay."


My wife, Annemarie, gave me a hug. "You'll make it work." She loves that I love to garden. She enjoys it too, but she allows my seasonal obsession to run amok and she enjoys the fruits of said obsession. "Besides, we're in Utah. It's sunny here."


With greater hope, I was back outside every day of the next week, checking for sprouts. It was on a Thursday that it happened. I was sure it wasn't grass. The shape was wrong and it was too far away from the edge of the lawn. "A sprout!" I hollered, bringing my kids running and my wife walking: she was carrying the baby.


"Yay!" my two oldest boys shouted. "Corn sprouts!"


And it was true. There were several tender green shoots poking out of the tough Utah soil. I was elated. We were gonna have corn!


Two months later we were giddily eating raw green beans, raw peas, fresh zucchini and yellow squash, and were pretty sure our pumpkins were going to be big. But the corn stalks were two feet, maybe three feet, high. No sign of the fuzz that comes out the top for pollinating. No sign at all. And the stalks were thin and the roots were visible at the base of the stem. I had no idea what to do.


Then it happened. I came home from work on a blustery day that promised rain. I was beaming at the cloudy heavens, pleased that the sky was going to water for me. I walked in the front door, kicking off my boots and settling into my prized blue easy chair. My two oldest boys came dashing up. I held out my arms for hugs and kisses, but they stopped short, their eyes wide.


"Dad," my oldest boy, Thomas, intoned, "bad news." He was a well-read six and an oldest brother, both of which he took seriously.


His younger brother, Hintze, nodded in agreement. "Bad news!"


"The corn fell down," Thomas said.


Heat and cold tingles fought over my spine and face. "What?" I yelped, my voice cracking. I leapt to my feet, dashed through the house and flung the back door open wide. "No," I whispered. It was true. My small field of light-emerald, three-and-a-half feet high corn was leaning. No, more than leaning. Some of the stalks were practically horizontal. Slipping my feet into my work shoes, I hurried to the corn.


"See?" It was Thomas, coming up behind me, "It fell down. The wind did it."


I nodded, numb. But, never one to give up, I set to feverish action. I waded gently into the garden, my hands tenderly lifting each corn stalk back to its vertical position. The wind blew. The corn fell again. I cursed the wind and straightened my corn plants again, daring the wicked southwestern gusts to come again. They did; the corn fell. Muttering dire imprecations for all things stormy, I strode to my storage shed. My gardening twine in hand, I (seriously) gently roped each and every stalk up, tying the rows to firm anchors on each end. Now the wind blew impotently. My corn was going to live! It was going to thrive! It would provide loads of delicious, nourishing staple food for my family!


By the end of August, it was clear my corn would provide very little, if any, delicious, nourishing staple food for my family. The tallest stalk in my tiny field reached no higher than my neck, fuzz and all. Small nubs were growing here and there on the healthiest of the plants, but they were not developing well. In the end, we got five little cobs. Kernels had formed over maybe seventy percent of the cobs' body.


But I couldn't believe that this disaster was due only to insufficient sunlight. As a regularly successful gardener, I knew that sunlight was vital, but my corn looked well, malnourished. It looked like I was promised I would look if I drank coffee as a kid: stunted.


I read the back of the seed packet again. Plant in warm ground in a sunny area. The crumpled packet also informed that the corn would be ready for harvest in eighty-two days. It further informed me that the seed company had a long tradition of good seeds. But it did not explain why my corn looked like it had been on a forty day fast.


It turned out that my corn had indeed been on a fast. A forced fast. A fast caused by my ignorance; one caused by my eagerness to plant and unwillingness to study and learn about my crops before I planted them. I wound up asking a garden club I had just begun attending if they had any idea why my corn had been such a spectacular failure. The patron of the club smiled, not at all condescendingly really, and asked me if I had used nitrogen.


"Nitrogen?"


"Corn is basically a fruitful grass," he rumbled. "Grass absolutely needs nitrogen. You can get nitrogen pellets at the seed shop."


"Nitrogen?"


He nodded, taking a bite from a club member's home grown apple. "You've gotta have it. Otherwise, your corn won't come out."


"Nitrogen." Embarrassed at my ignorance, I buried my face in a plate of blueberry cobbler.


So what did my garden teach me? After long days of staring at bare ground and then obsessively urging my puny stalks to grow? Followed by weeks of wishing the corn cobs would finally form and thinking that corn was supposed to be taller, wasn't it? My garden taught me to look before I leap. To take a few minutes and get educated about what I am planting. My garden taught me to ask around and to talk to people in the area who have experience with vegetable gardens.


You know what? My garden also taught me that gardening is also about community.

Sunday, May 2, 2010

Since it's Sunday

I'm going to post an article I wrote recently that provides a solid overview of organic gardening practices and principles.


Organic gardening can be broken into these areas: Soil, Plants and Nurturing.

SOIL
The basic idea of organic gardening is that chemicals that are harmful to the environment and potentially prejudicial to humans and animals are not used. So when you are preparing your soil, you basically just want to keep from using any chemical fertilizers.

Manure, that lovely waste product of equines and bovines, is the best fertilizer out there. What's more, you want to try to get manure from animals that have been fed on alfalfa, rather than on grain such as corn. This just yields better, more balanced manure.

You can get bagged steer manure from your local gardening center usually. When you've gotten some manure, the method of application is simple. Simply spread it over the top of your garden area. If you are doing container gardening, go ahead and put it on the top of the soil in the containers. You are looking for a layer of a couple inches of the manure.

With the manure spread out, you are ready to mix it in. So if your gardening area is small enough, do this by hand. Try to get about six inches down into the soil. What you do is dig down and then turn over each spadeful, breaking up the dirt clumps as you go. This will mix in the manure and loosen up the soil.

If your garden area is big, say larger than 75 square feet, you might want to use a roto-tiller. These are heavy-duty machines, but they save you time and do a good job.
Now you are ready to move to plants.

PLANTS
One of the hallmarks of organic gardening is the art and science of companion planting. This type of planting does three things: maintains soil/nutrient balance, encourages plants to support each other, and repels common garden pests.

First off, you can do as the American Indians did and plant corn, squash and beans together. Beans provide nitrogen and potassium to the soil, which corn needs since it is basically a grass. The tall, strong corn stalks provide poles for the beans to climb. The squash fills in spaces and shades the ground.

Another companion set is the tomato/pepper, onion and marigold set. If you plant your tomatoes and peppers with onions in amongst them and a border of marigolds, most common garden pests will keep away. Spiders will still show up, but these lovelies are wonderful because they eat bugs too!

The only other organic issue regarding your plants and their arrangement is the choice between organic seeds and non-organic. The truth is that organic is in the nurturing, not the seeds. So you can get any kind of plant you want and still raise an organic garden.

This is not to say that some organic seed and plant choices aren't worth it. If you can get heirloom seeds, your plants will actually provide seeds for each year's garden. This will not happen if you get regular old hybrid seeds and plants.

NURTURING
Your goal is to avoid all toxic pesticides and fertilizers. We say toxic because you can actually get mycelium (mushroom)-based pesticides that are in no way harmful to soil and animal (and human!) life.

As for fertilizer during the growing season, don't use Miracle-gro. Get another bag of manure or make a compost pile. Then, when the season is in full swing, spread the compost mulch or the manure around the base of your plants. Then just water as usual. The nutrients from these organic fertilizers will get the job done.

And that's pretty much it for this session of Organic Gardening. One final note about organic gardening is that it pays to be creative. Try new arrangements and experiment with lightweight row cloth to keep wicked pests away from your plants. For example, lightweight, water and sun permeable row cloth will keep quail from your lettuce and peas. So build a little framework and put some row cloth down. This is better than getting some nasty chemical that wards off quail.

Saturday, May 1, 2010

Okay, chickens today.


Raising chickens is all around a good thing. Today we got seven eggs, so it can be a tasty thing too! But were those eggs cheap?

That's the question I want to answer here today. 

Getting started with chickens is where the majority of the cost you will expend will happen. Your chickens will need a place that they can stay during the night where foxes, raccoons and rats cannot get to them. This is the same whether you are in suburbs, the country or even in the city. 

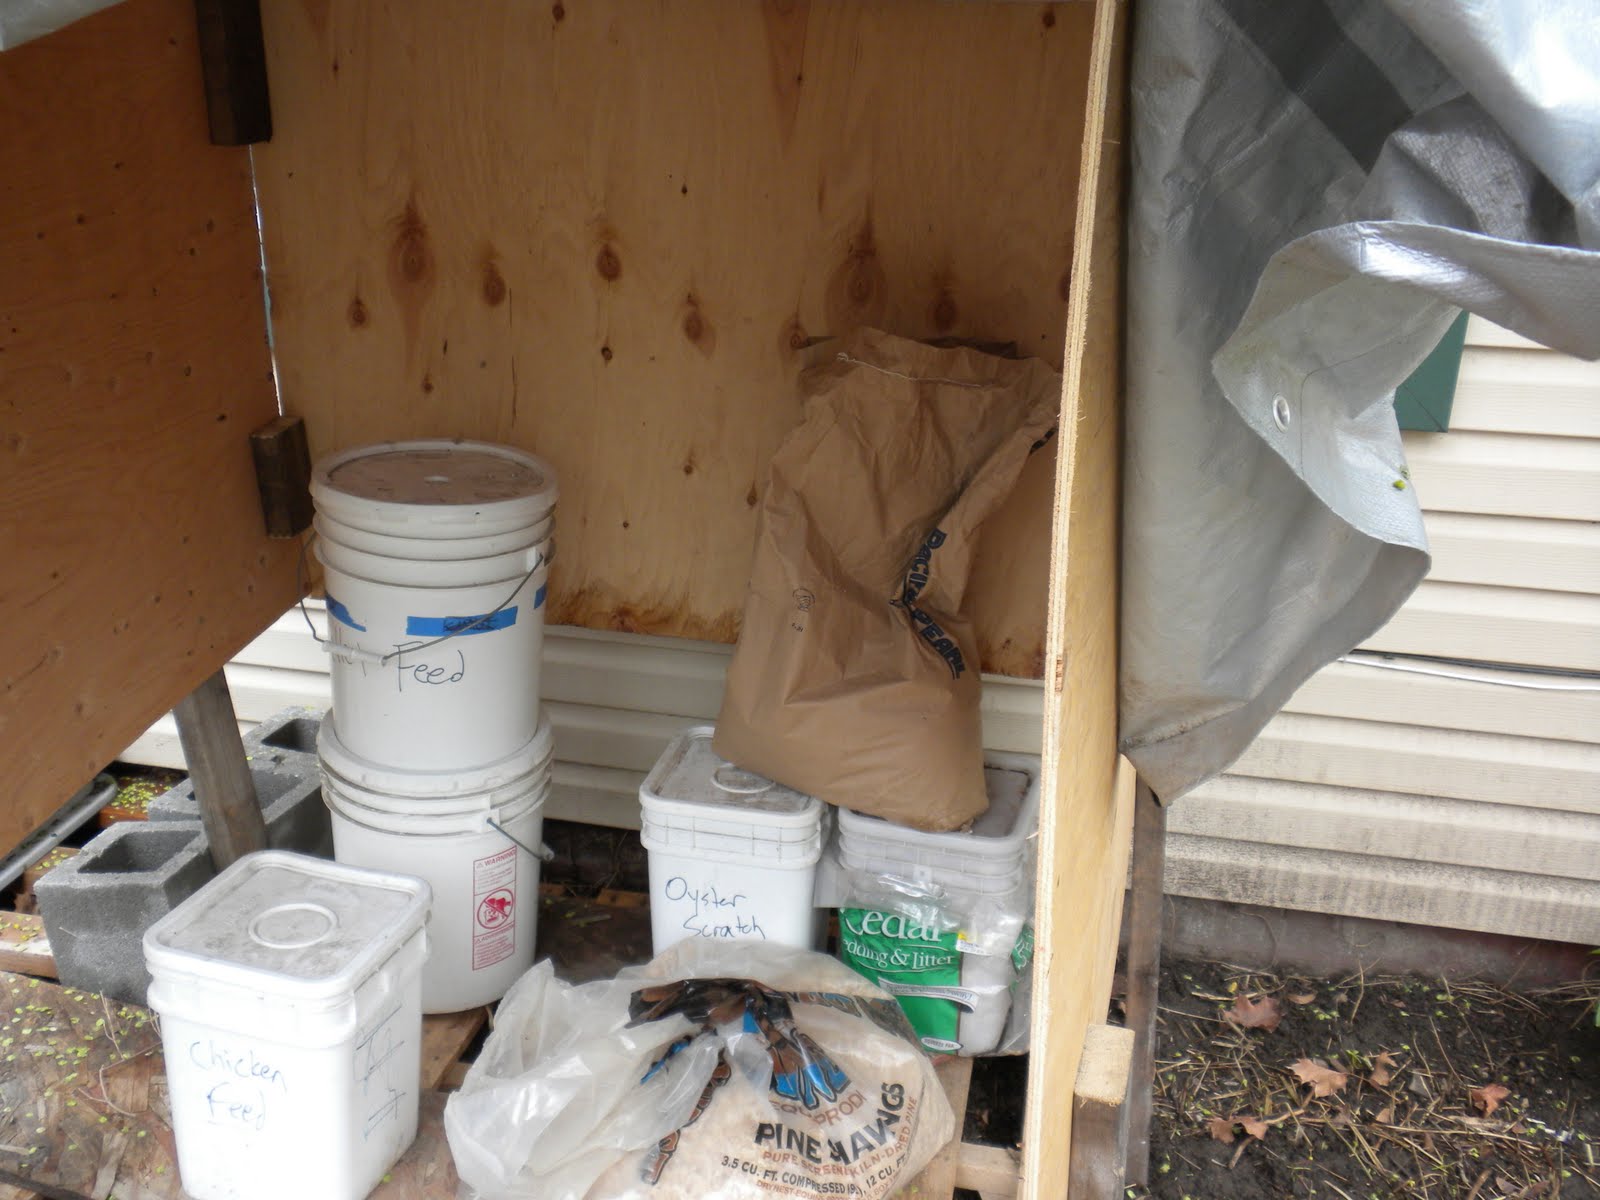
Your chickens will also need a place that they can lay their eggs, equipment for food and water, and if you have  a coop you will want to have something to cover its floor. The also need a sheltered place that they can roost when they go to sleep. You will also need a place to store their food and whatever you will use to cover the floor of the coop and the laying boxes. 

So I'm going to show you what we've done. Our city has an ordinance that allows for a few chickens, so we've gone ahead and gotten some. We raised four of the seven from chicks-- the other three were given to us by some friends who had too many. 

I won't go into raising chicks today, but I will discuss and show what we've done to maintain the chickens. 

We decided that the chickens needed a coop where they could be safe from nightly predators. I spent a lot of time looking for ideas and materials for this coop. We at first thought we might build them a nice house for them to chill in during the evening-- they could wander the back yard during the day. However, building materials and such were pretty expensive- so I decided to do a coop. 

I first looked into getting a dog run that I could stretch chicken wire over as a roof. You need a roof because predators like raccoons and rats can climb. Heck, having a floor is a good thing too. We thought a run of about 4-5 feet wide and 8-10 feet long would do well. You can buy these prefabricated at DIY stores like Home Depot and Lowe's. 

They were over $200. Add to that the cost of chicken wire and such and it's getting pricey! 

But we needed something like a dog run, because we needed to be able to get in and out of the coop easily to get eggs, change water, provide food and do other work. 

So I thought about building a coop with 2x4's and chicken wire. 

2x4's were a little pricey too. 

Then I had this idea that I could build a frame out of pvc, then use zip ties to fasten chicken wire to the frame on all sides, the bottom AND the top. I drew a blueprint, gathered measurements and checked prices. The zip ties were a friend's idea, actually. I could frame a doorway pretty easily and build a door with the pvc too. 

The total would be just over $100. This was the best option. 

So I built the coop: 


Notice it has a door. Most mornings, we head out and wedge the coop door open and build a quick barrier of compressed board between the open door and the house wall. This allows the chickens to come and go between our back yard and their coop as much as they want. 

They don't wander much beyond the back yard. Sometimes they will hop a fence, but it's rare. 

Anyway, take a look at that coop! It's about 8 feet long and four feet wide. The door is just over 2 feet wide. The coop has chicken wire all over and we bungee the door closed when locking the chickens up for the night. 

Notice two white, upside-down buckets with red bottoms. One is their feeder and the other is their water. They usually find bugs and scraps in the back yard, compost and garden plots for the majority of their food, but we like to make sure they have enough to eat. A well-fed chicken is usually a good layer. 

See- they wander: 


Inside the coop, the chickens have a roosting shed: 

The shed is 1/4 inch ply wood, 2x4s, some corrugated roofing and some 1 inch closet rods for roosts. I spent less than $50 and was able to build this shed and the storage shelter I'll show you in a minute. Here's a heads-up, I built the top, sides and back as separate pieces, then assembled the roosting shed inside the coop. 

The chickens roosted in this through the entire winter and had no problems whatsoever. Winters here are plenty cold. We used an electric dog water bowl to make sure they had plenty of un-frozen water through the season. 

Inside the coop, they also have laying boxes: 


This is an old kitchen cupboard. You're looking at what used to be the back. We nailed the doors closed, made the openings in the back much smaller, and fastened rag strips to the openings too. Chickens like a nice private place to lay eggs. 

Using this cupboard- which was taking space in our storage basement- was my wife's idea. It was brilliant. 

And here's the storage shelter: 
The tarp is there because the storage shelter is essentially the same design as the roosting shed- it has an open front. Here's the easy way we get in and out of the storage shed- we hook an the tarp on a nail: 

And here's the inside: 

You just don't want your food or material for the coop's floor to get wet. In a few weeks, we will go find a good straw bale and it will get stored in here too. 

So that's pretty much the set-up. 

Materials for all of this ran about $180 or so. Food is not expensive, although you want to figure in gas cost. The chickens only start laying at about 5 months old, if I remember right. 

The point here is that the eggs are not actually cheap. They are delicious. The experience with the chickens is beyond value for us as a family. You never get in a bind and have to go borrow eggs from a neighbor. 

And you know what? The chickens are keeping the back yard completely pest free. No earwigs. No pill bugs. No ants even. 

We'll talk about chicken care and maintenance in the coming days. 

Friday, April 30, 2010

No chickens today.

But I have a good reason: I was busy all day with work, helping someone move, and then an anniversary date. Yes, that's right, today is our 12th anniversary. Okay, by today, I mean April 30th. Because May 1st is not our anniversary-- that's my birthday.

So because I was busy all day, I still haven't taken the pictures I feel like I should use for my piece on the chickens. Thus, I will instead share some thoughts on basic organic weed control. This will apply to weed control in the garden

Weeds, contrary to many novice gardeners' belief, are not the bane of organic gardeners' existence. In truth, it's the bugs that really cause problems. But just as in the case with garden pests, there are some nice organic solutions to the weed problem which can help your garden flourish. These solutions can be broken down into two categories: prevention and elimination.

PREVENTION

The old adage of "an ounce of prevention is worth a pound of cure" applies to weeds particularly well. Here are some of the more choice organic approaches to preventing weeds from growing in your beloved garden patch.

*Black plastic weed-blocker. This material is easy to come by at most nurseries and home improvement outlets. It is very simple. When you have your garden patch ready, with all of the manure or other organic materials tilled in and the soil well prepared, cover the patch completely with the black plastic weed-blocker. That's right, cover the whole patch.

When you're ready to put your seeds or seedlings into the ground, you can simply cut holes into the weed-blocker cloth for your plants to grow through. What's nice is that most of this cloth is porous enough to allow water to get through and keep the plants you want to grow fed. However, this writer has found that laying out soaker hose and then covering the patch with the cloth works best.

*Mulching. This approach is simple, but is not quite as reliable as the weed-blocker cloth. The intent is the same: to not allow the weeds to grow. However, arranging mulch around your plants and seeded areas simply doesn't work as well to block weeds. This is because the weed seeds that come from the trees or plants nearby can still work their way through the piles of mulch and establish themselves.
The benefit of using mulch, on the other hand, is that mulch is a nice organic material that fertilizes even while it is blocking weeds from growing.

*Soil cultivation. As you work the soil of your garden plot, you will naturally be helping it become healthier. You will also be eliminating any old established roots of weeds and grass that were already there. I know a woman who has been nurturing her garden plot for over twenty years. She has no problems whatsoever with weeds.

ELIMINATION

*Organic herbicides. There are several effective organic herbicides on the market today. These include AllDown, Xpress and Matran 2. These have been shown to be more effective on emerging weeds than on established weeds, but they can still help with established weeds.

But that's not all! Some organic gardeners have found that vinegar can be an effective herbicide as well. To try this out, use a sponge to apply your household vinegar onto the leaves of the weeds you want to kill. You can also try this with soap, but most soaps will not kill weeds.

*Manual destruction. In the desert, some folks use a portable propane torch to burn weeds out of their garden areas. This is effective and is also a permanent solution. If done carefully, this approach will do no damage to the garden plants you are nurturing.

Another manual approach to weeds is to simply pull them. In order to increase your ability to pull weeds easily and completely, water well the day before you are going to weed. This will soften the ground, making it easier to pull weeds. You can also use a hoe to cut down weeds en masse, although this will leave the roots in most cases. But as a quick fix to large amounts of young weeds, the hoe can't be beaten.

Ultimately, using organic approaches to killing weeds is a choice that each gardener has to make individually. What it comes down to is whether you are willing to do a little extra work to keep the soil of your garden properly balanced.

Thursday, April 29, 2010

I know I said I'd discuss chickens

but I think it would be a better thing to talk about compost today. I will try to get to chickens tomorrow. I also hope to have a guest blogger in the next couple of days. Exciting!


So on to composting.


Garbage dumps smell. So do landfills. This is probably the case because these places are full of the rotting waste and detritus of thousands of people. If you’re looking for motivation to compost, you might try taking a walk around one of these blights on the landscape. Then it might also help to know that when most families start composting, the volume of garbage that they produce is reduced by about 30%.


So if you’re just hoping to reduce your impact on the environment, composting is a great way to go. But if you’re also looking for a cost-effective, relatively easy, and ultimately educational way to get great fertilizer and dirt, composting tops the list of things you can do.

Whether you live in a condo with no yard, a townhome with less than 100 square feet of lawn space, a house with a nice-sized back yard, or anything in between, you can compost. In other words, no matter what your living situation, you can compost. To learn about composting, you could Google ‘compost’ and quickly become overwhelmed by the myriad resources available. In doing this, you could also learn about thermophilic microorganisms, and mycorrhizae. But why would you complicate things when composting is actually an incredibly simple process?

See, the thing is that when plants grow, they take in carbon dioxide from the air and nutrients and water from the earth. Then when they die, they naturally decompose and return those elements and materials back to the earth. So the truth is that when we compost, we are simply taking part in a natural process that has been going on for millions of years. Thus, in order for us to be able to compost and take advantage of the multitudinous benefits of doing so, we just need to imitate nature.

There are plenty of methods and approaches to composting, but they can basically be summed up into two categories: closed container and piles.

Closed Container
Modern closed containers look essentially like barrels propped on their sides on a stand. These barrels have an opening through which organic materials, such as vegetable and garden leavings, are placed into the container. With that opening sealed closed, the barrel is rotated on its axis, combining old materials with the newer materials. These containers also have air vents.

Closed containers work well because they obey the three principles of good composting: stirring, air and shade. When you rotate the barrel, you stir the materials, thus eliminating noxious fumes that might build up under layers of inert plant material. Air is necessary because it helps the plant material break down. Shade keeps things from drying out, which is necessary because moisture also enables the process of decomposition.

Barrel composters come in a variety of sizes. The urban composter who specializes in indoor or container gardening can actually get a composter that they can put on their kitchen counter. Usually coming in an attractive shade of green, these small composters, if used correctly, will keep even the most sensitive of noses happy.

You can also find container composters that vary in size from four feet to six feet tall. Some of these composters are designed to create a wonderful organic tea that is full of nutrients. This type of composter works in much the same way as other container composters, but they have a way for the fluids that are produced through the process of decomposition to seep out and get caught in a tray. Some of these composters can hold up to four gallons of nutrient-filled liquid.

Make a pile
If you’ve got some space in your yard, making a compost pile can be the easiest and most straightforward way to get your compost going. To make a compost pile, you need to find a relatively shady area in your yard. If you can find a shady spot that also gets hit by your regular lawn watering, you will be in business.

With your compost spot chosen, all you need to do now is collect your grass and leaves, as well as your organic kitchen waste and then deposit all of this on your spot. You can even add egg shells and bread leavings to this pile. Then keep it moist. Wait two weeks before doing anything, making sure you are consistent with adding organic materials to the pile.

After two weeks, use a pitchfork to turn the pile over. Your objective here is two-fold: get air into the pile and move the top layers to the middle of the pile. You should, after these first two weeks, have some nicely decomposing organic material that is black and moist-looking. If you have kept your compost pile wet, you should also see quite a few healthy worms in your pile as you turn it over. Worms are your friends; they help break down the organic material into delicious dirt for your garden.

Your compost pile doesn’t need to cover much ground, and this can be helped if you put a containing frame around it. This can be done using 1”x6” boards as retaining walls. Of course, if you really want to make a fancy compost, and you have plenty of space, you can use the increasingly popular three-tiered system. 

Here's a helpful image: 

This system utilizes three different sections, numbered 1, 2 and 3. Number 1 is the farthest to the right, where you place your fresh organic waste. If you keep it all wet, in two to three weeks you can turn the material in number 1 over into number 2. Then a few weeks later you can move the fully decomposed material into number 3 by sifting it through a wire mesh. The compost waits in number 3 for you to put it to use. 


Notice in the first picture that there is a shelf-looking thing across the top of #3, but in the next image it is across #2. It is hinged. When you sift material through it into #3, big chunks are often left behind. Simply swing the mesh shelf over to #2 to dump the chunks back. 

You might be intrigued by the three-tiered system, and this is fine. But all you really need to remember if you want to start composting is that anyone can do it. Whether you use a low-cost container composter in your home, a large barrel in your backyard or a compost pile, you will be able to reap the myriad benefits of making your own compost.